Decal Girl vs. Drone Wrap Japan?

Decal Girl vs. Drone Wrap Japan?

Is Decal Girl or Drone Wrap Japan better for the DJI Mavic Pro?

Well, I bought another DJI MAVIC PRO. So, I purchased another wrap. Furthermore, DJI has now released the Alpine White Edition  -_-  I wanted to discuss which company I think is better as a long-term fit for the Mavic. Of course, each brand has their pros and cons, but ultimately the primary decision is up to the drone owner. Variables such as how long the wrap will stay on, multiple skins, or even how much you're willing to pay for a wrap. Below are a few initial strengths and weakness of both Decal Girl and Drone Wrap Japan.

Drone Wrap of Japan  (DWJ)

Pros

  • High-quality finish with superior adhesive
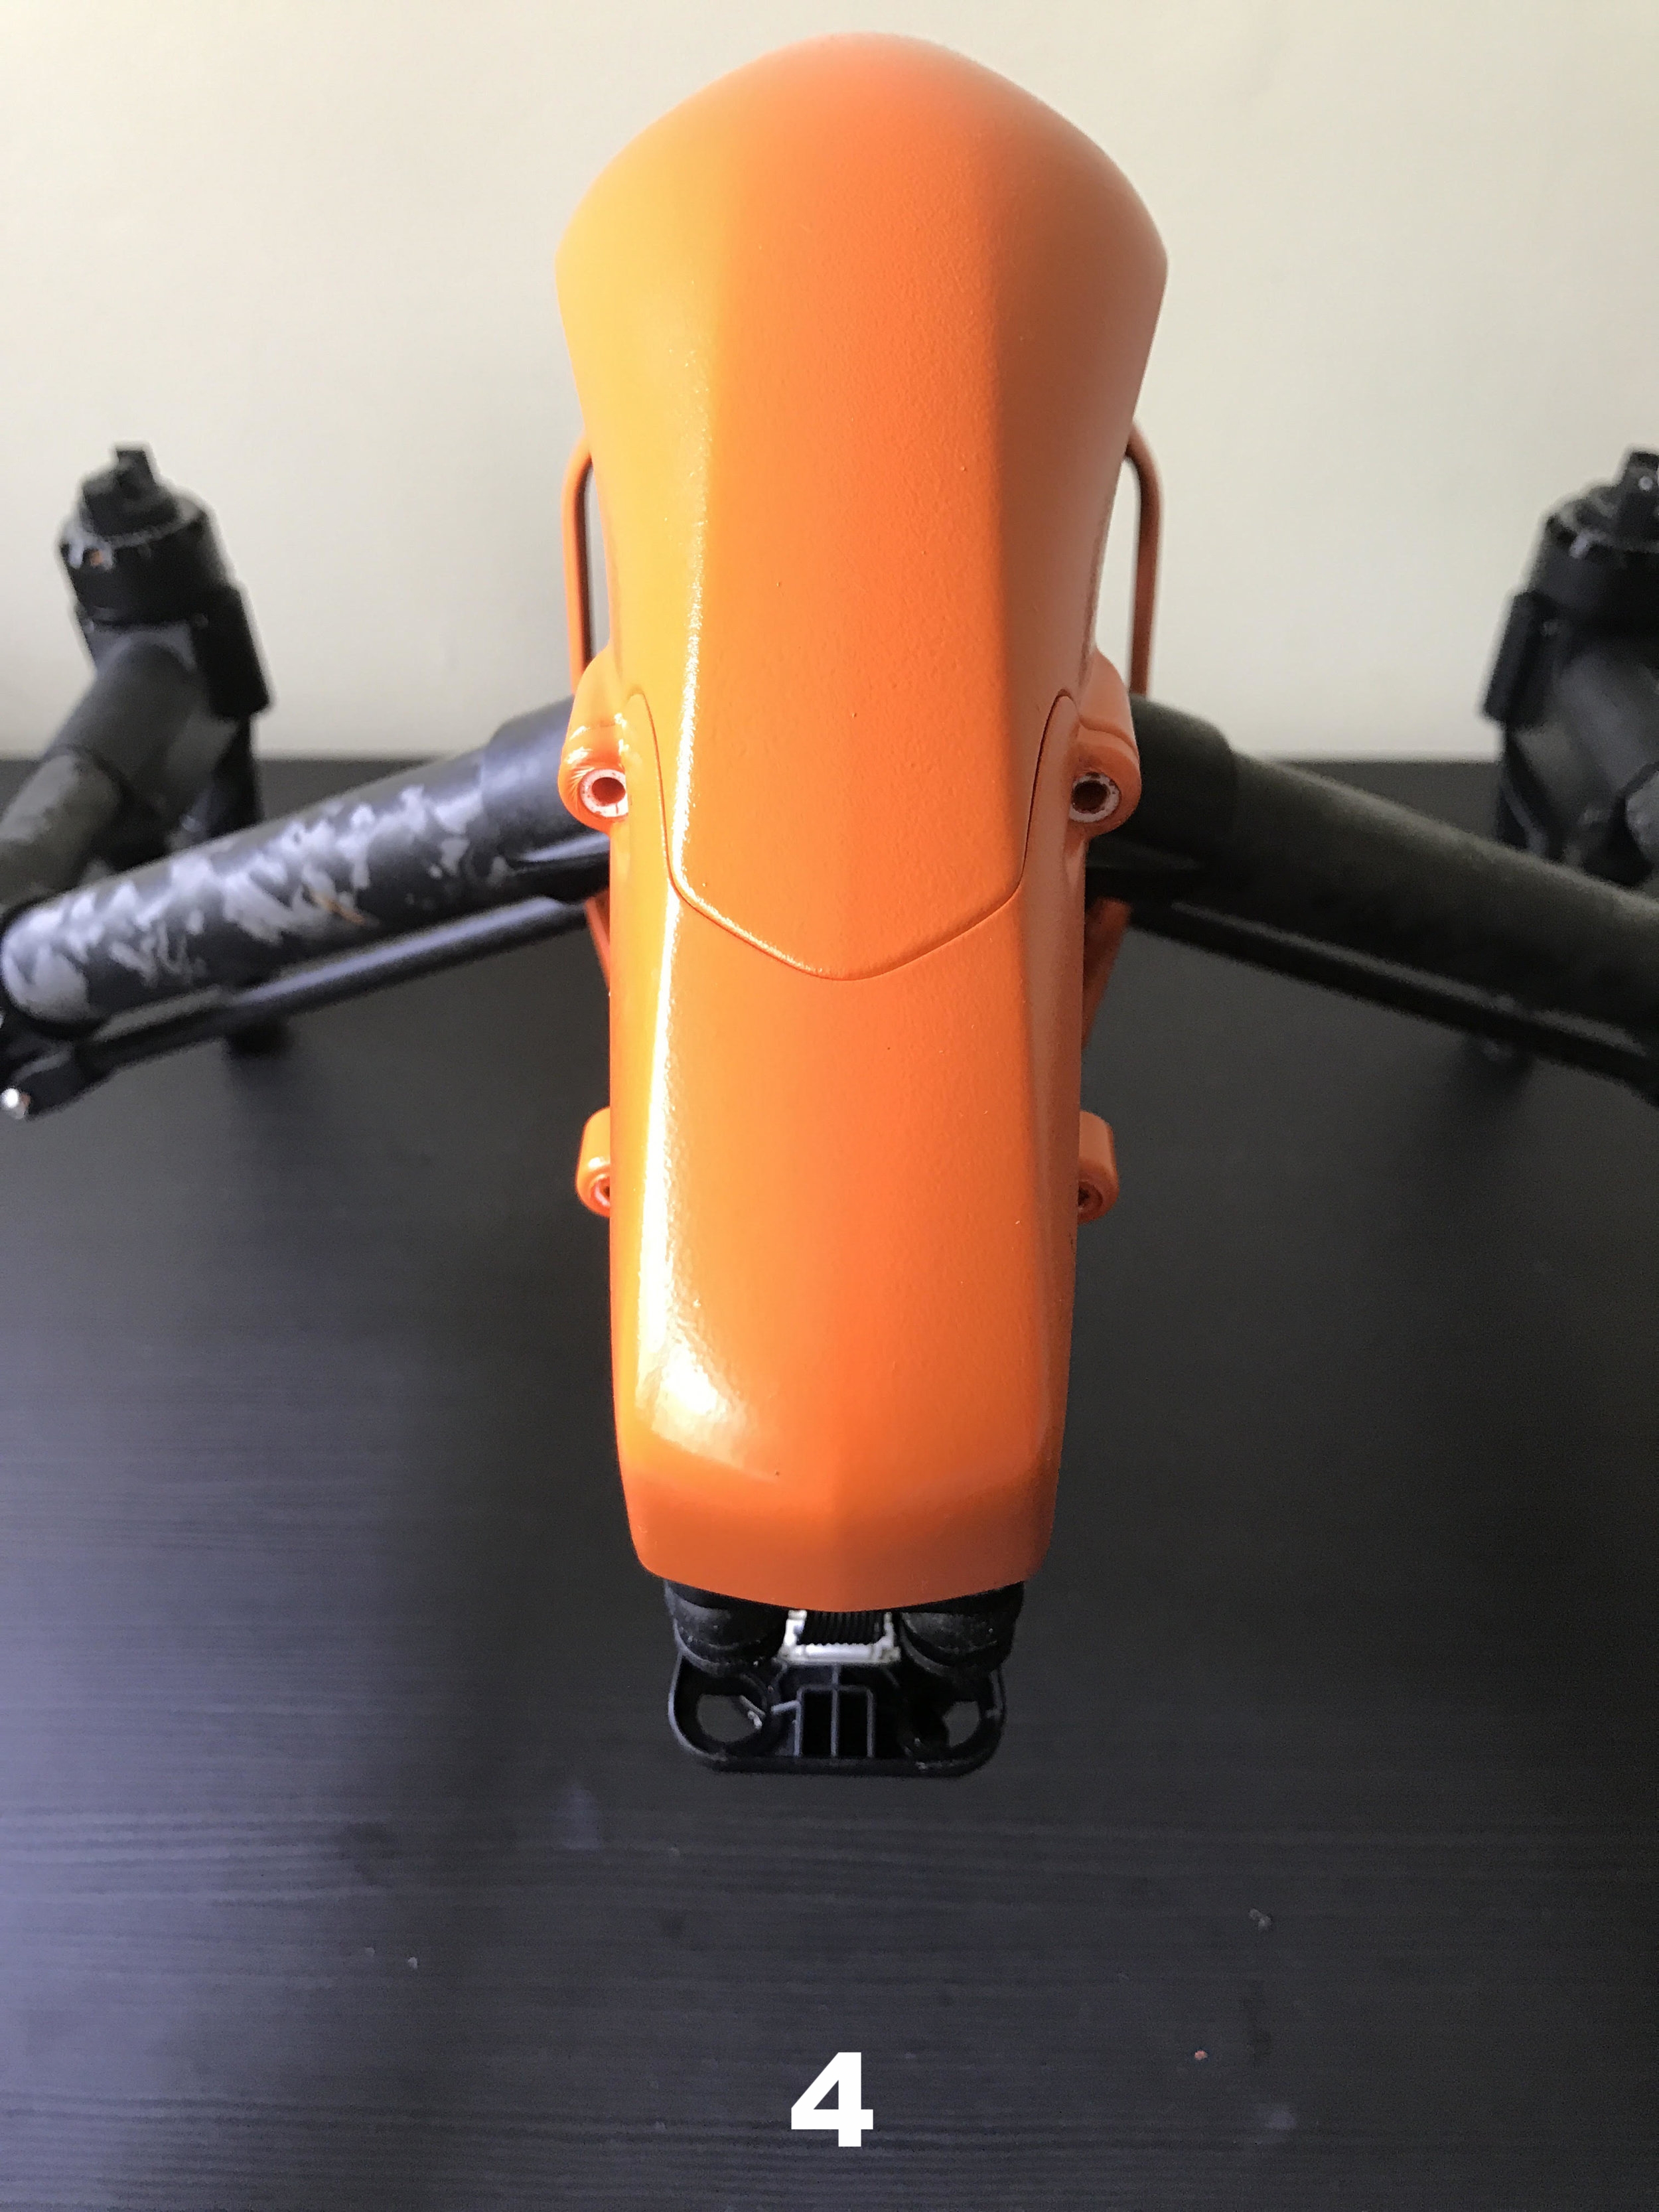
  • Increased coverage compared to the Decal Girl skin
  • Great instructional youtube video

Cons

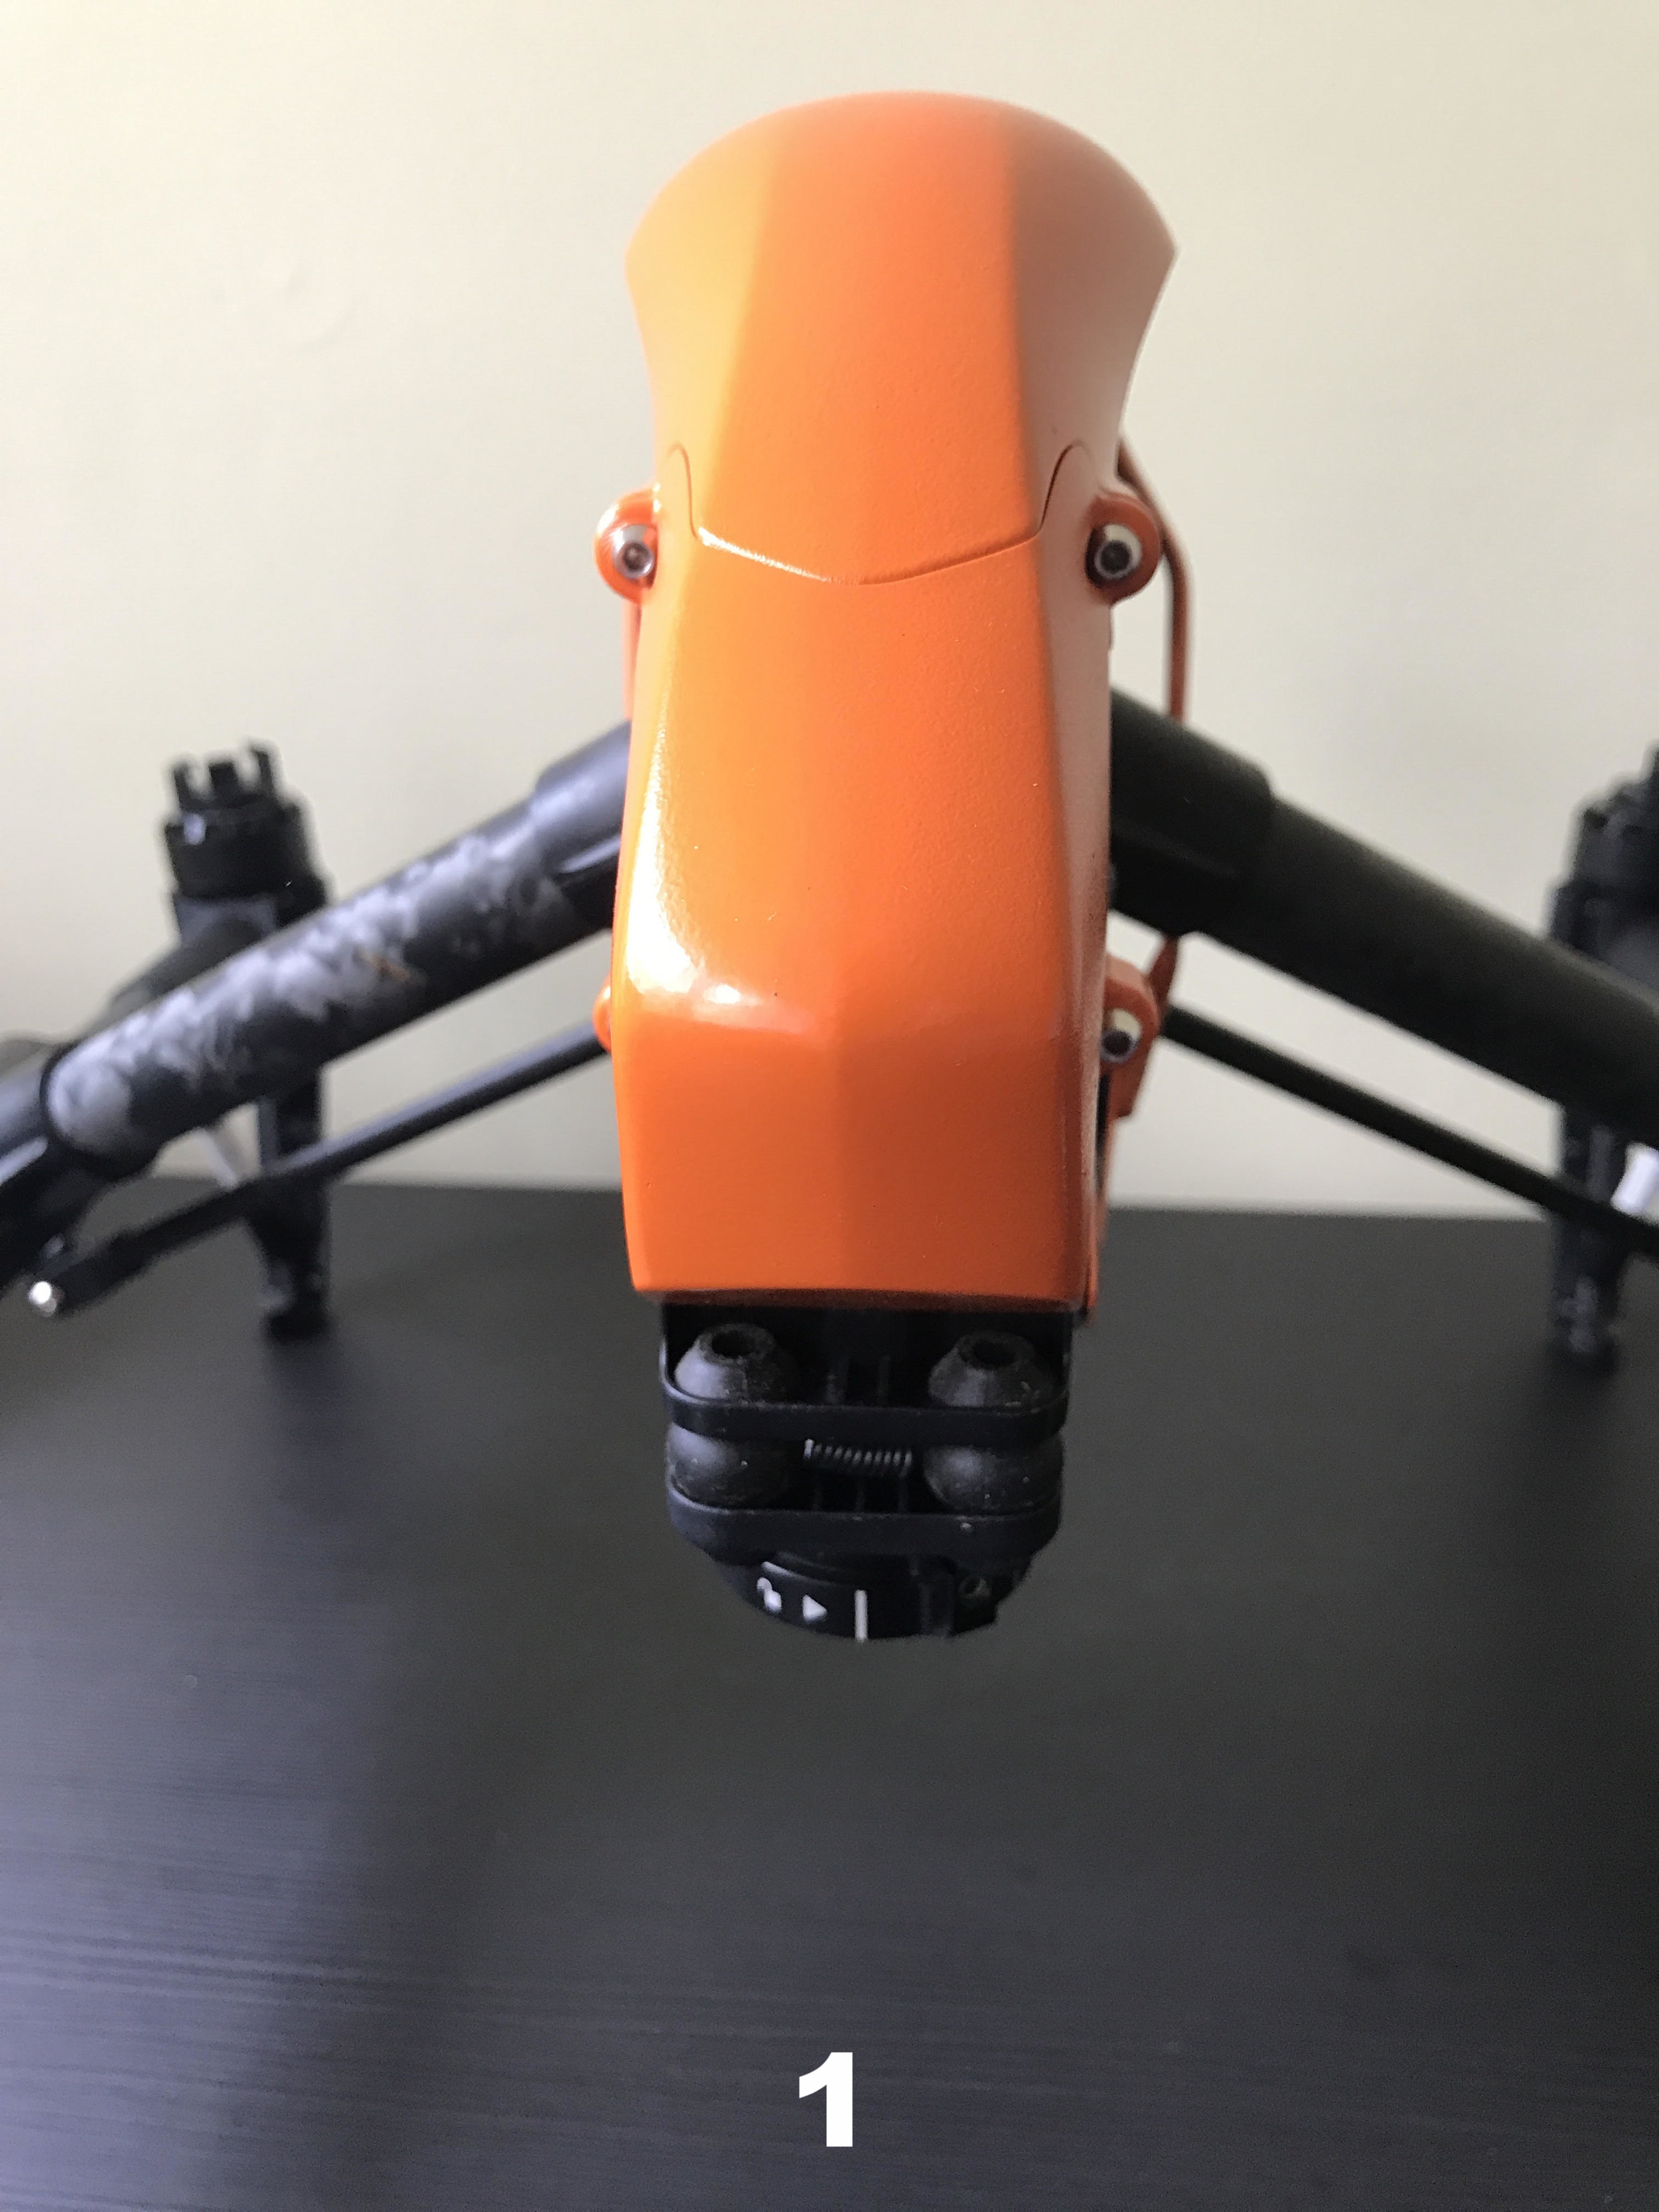
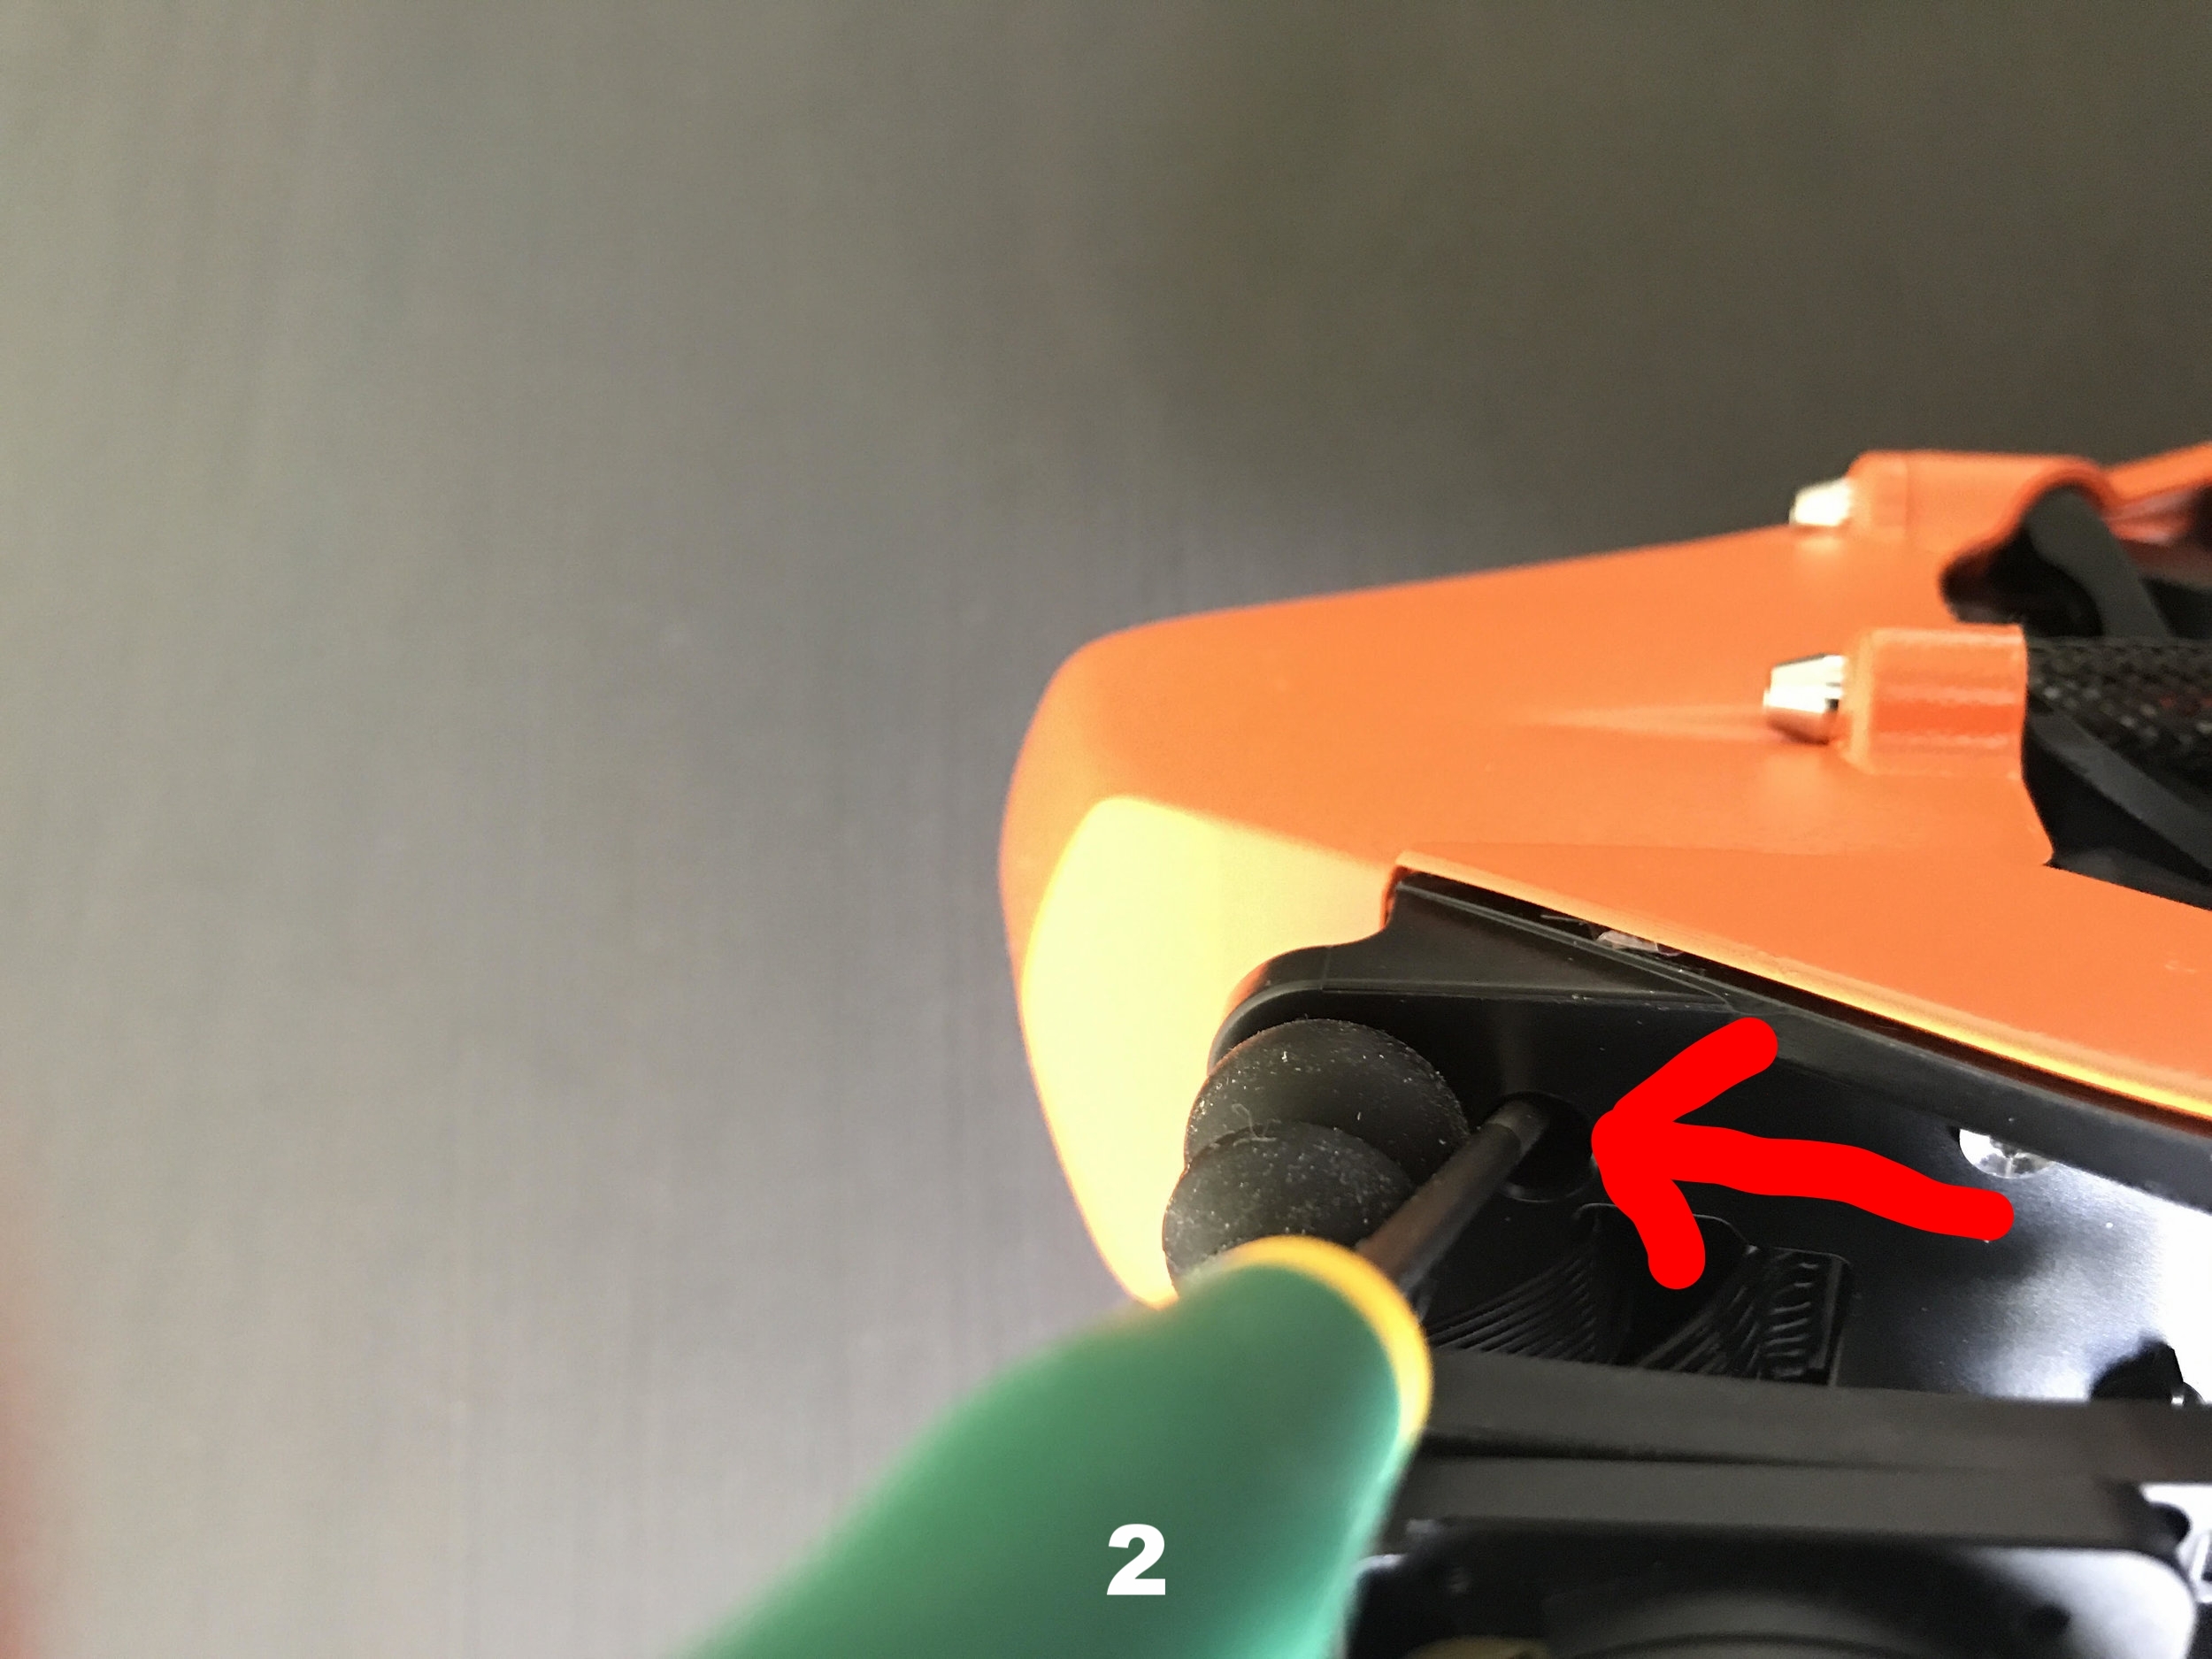
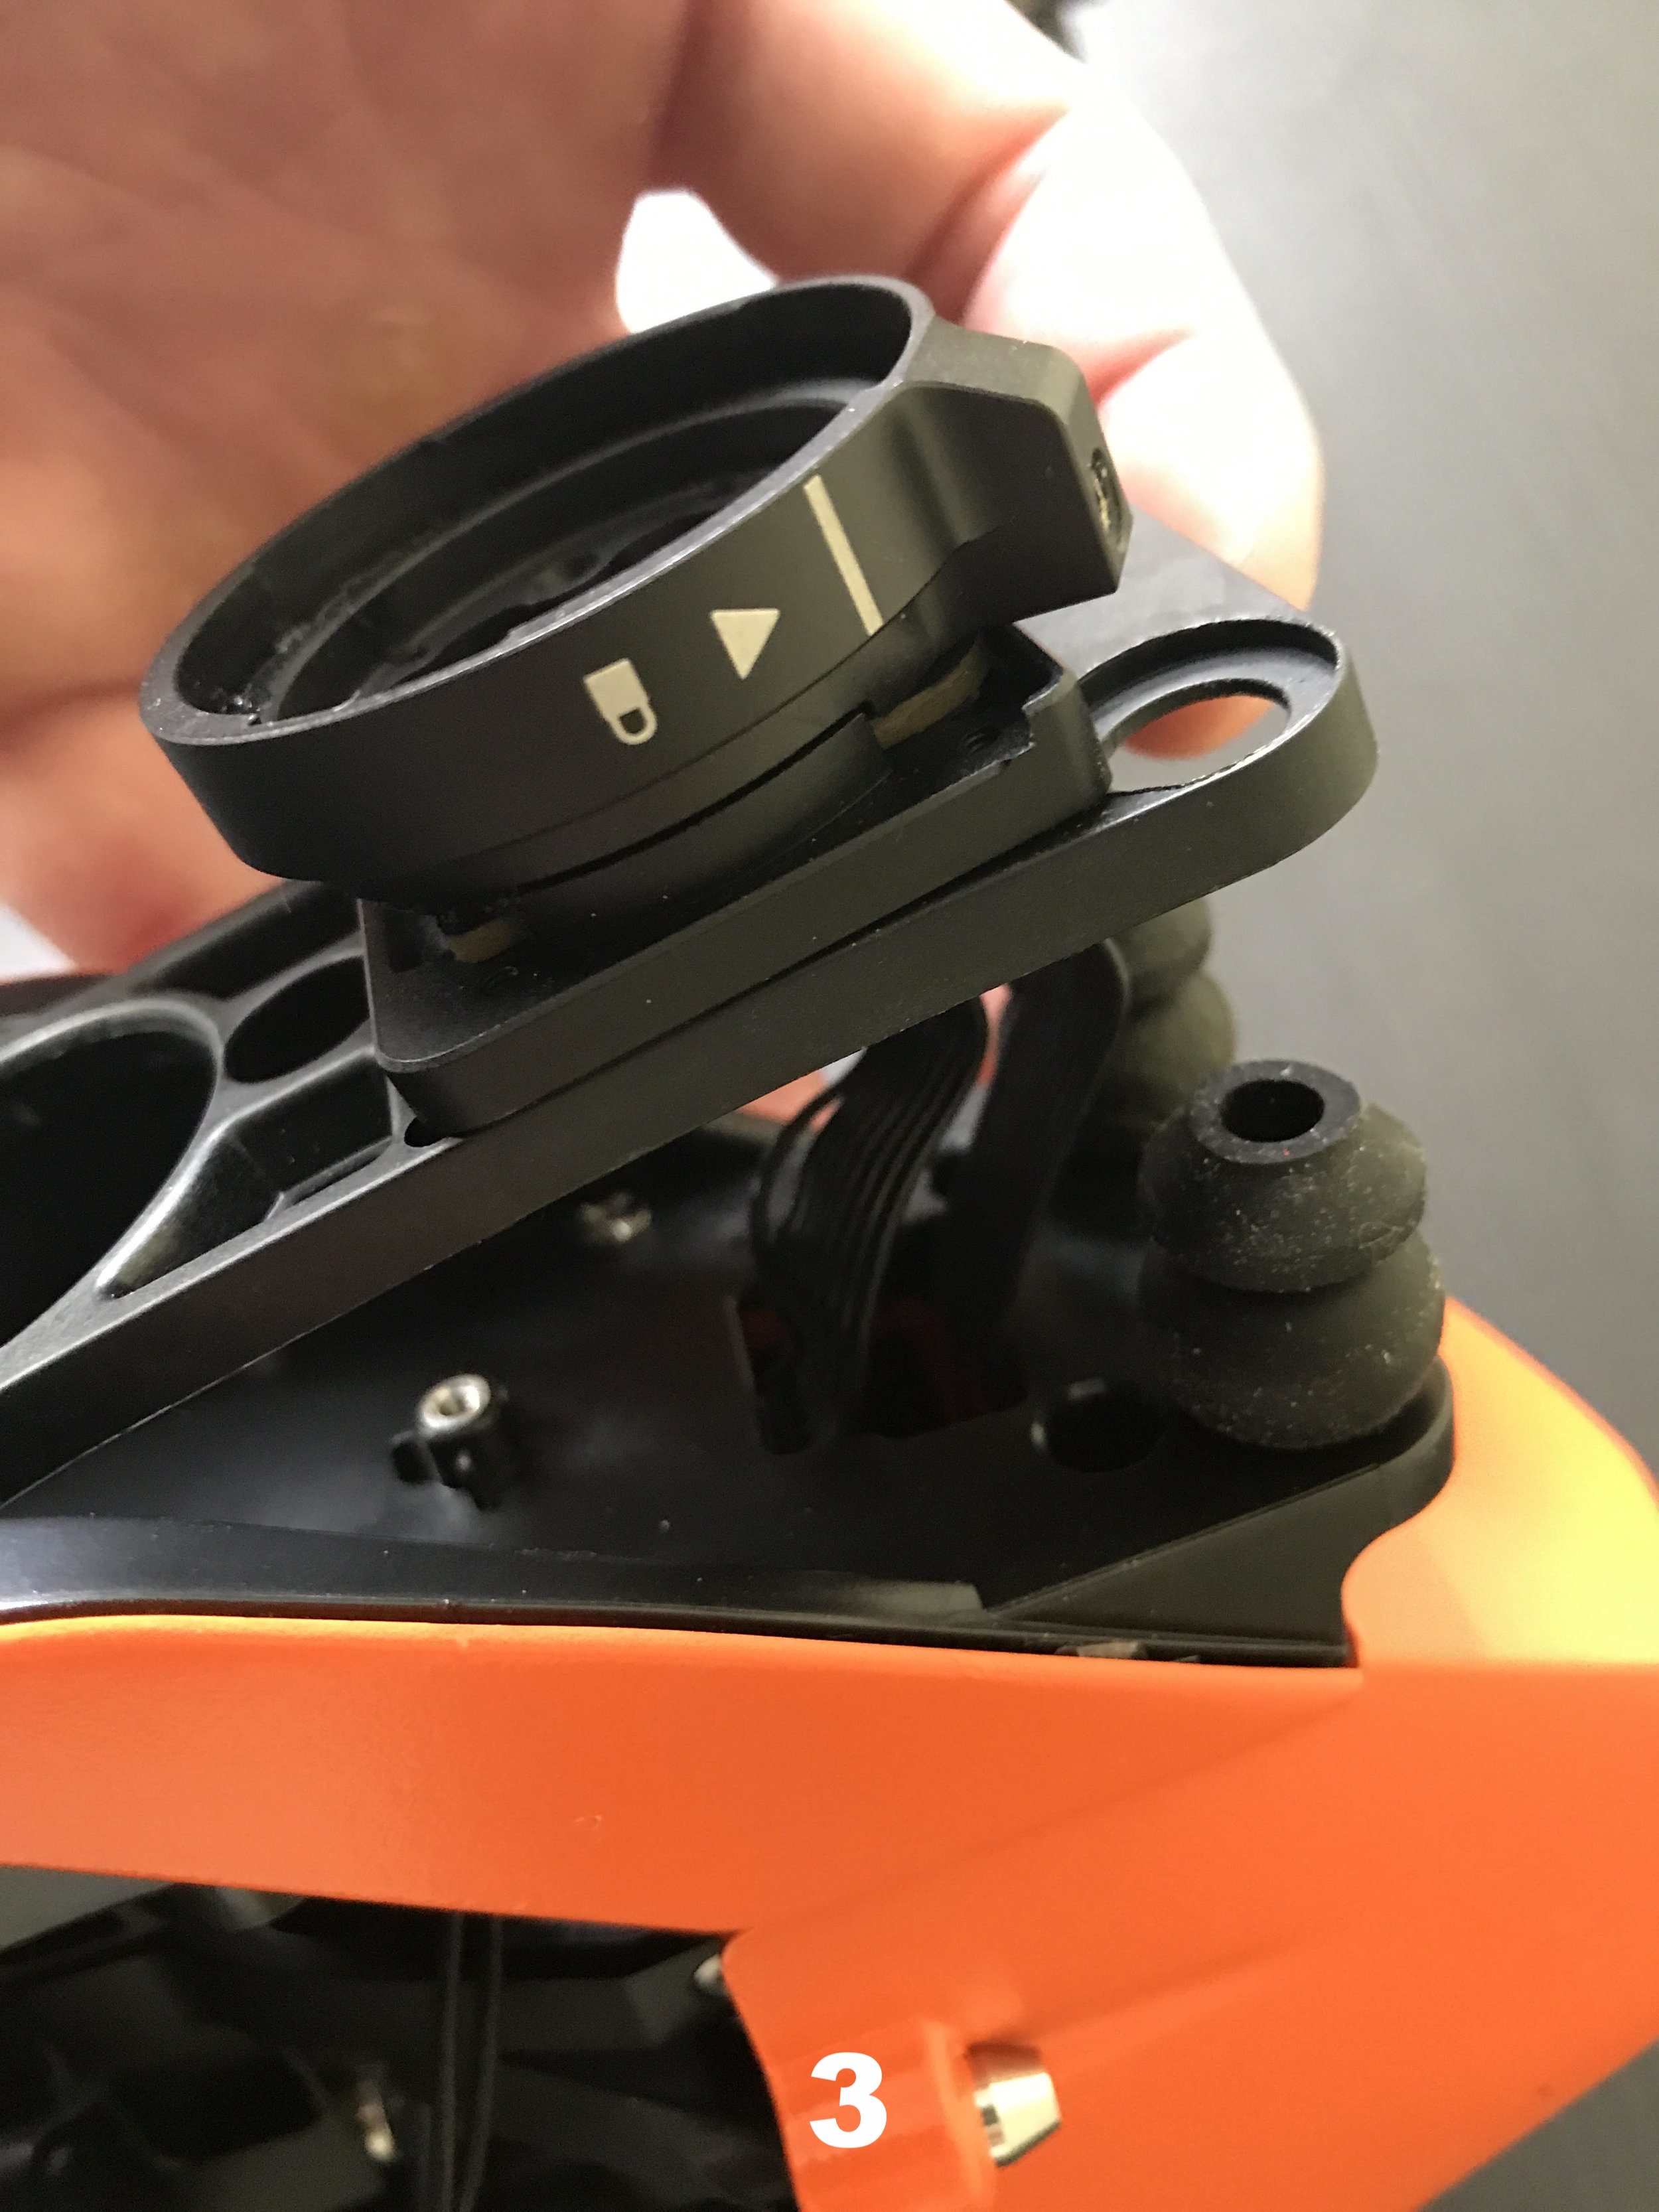
  • Material rips easily (see pics)
  • Long wait time
  • Expensive

Decal Girl (DG)

Pros

  • Great value
  • If you mess up a little, the material forgiving but weak glue
  • Paid for and received within 72 hours

Cons

  • Less coverage than Drone Wrap Japan
  • The skin is quite thin
  • Water caused some issues with ink

Since I bought my first Mavic wrap, Decal Girl has released the V2 skin which has much more coverage than the original. While comparing Drone Wrap Japan vs. Decal Girl’s V2, I think the better value may be the V2.  However, if you intend on keeping the wrap on long-term, Drone Wrap of Japan is better suited. Personally, my only complaint about DWJ is the material rips very easily. Not having the Mavic’s front legs covered is my issue with the V2. In addition to what I’ve mentioned already, Decal Girl has an extensive collection of skins ready to go including Solid State Yellow, Digital Woodland Camo, and Waterfall. There is also an option to upload your own media file and use that as your wrap. There have been a few rumors around DWJ releasing new design too, on MavicPilots.com.

PolarPro Gimbal Lock/Lens Review: Phantom 4 Pro/Adv

PolarPro Gimbal Lock/Lens Review: Phantom 4 Pro/Adv

I simply couldn’t wait for PolarPro to release their gimbal lock and lens cover for DJI’s Phantom 4 Pro. DJI supplied an extremely sturdy gimbal lock with the Phantom 4 Pro, but the amount of trauma the gimbal took while putting the lock on was extreme in my opinion. To me, the included gimbal lock was nearly identical to the one provided with the standard Phantom 4 just slightly larger to fit the new 20MP camera. One interesting feature I’d like to point out is the indentations on the bottom rubber of the landing gear (P4P). This was added to the Phantom 4 Pro because of the complaints people had while using the gimbal lock on the standard P4. While these areas made it easier for users to line up where the gimbal lock should go, there was still no improvement on the extreme wear and tear DJI’s lock put on the gimbal.

When using ND filters, taking them on and off constantly can be a big PIA. However, one of my favorite attributes is the ability to keep an ND filter on while using the gimbal lock. Having the capacity to keep a filter on makes set up and breakdown time drop 50% (for me). Half the battle sometimes is taking the lens cover off the P4P and then replacing with the appropriate ND filter. Now, because of PolarPro’s gimbal guard I can take the drone out, put the props on, fire up the RC, the AC, and I’m in the air.

Top 3 Reason Why I love PolarPros Gimbal Guard

  1. Easy on and off

  2. Less trauma to the gimbal

  3. Ability to keep PolarPro’s ND filters on while using

I made a short video of PolarPro’s gimbal lock for the DJI Phantom 4 Pro here. Please check out the video, my comments will be easier to understand.

A few things to keep in mind

  1. Make sure you hear or feel a “click” once the lock is completely on

  2. Verify that the square portion of the lock is touching the camera properly

  3. Be sure to check the ND/UV filter is screwed on thoroughly

  4. Confirm there is no debris inside the lens cover

Using PolarPro's Gimbal Guard in the Outdoors

While on a recent road trip we were able to really put this product to the test. During our trip, the drone would sometimes have to endure tough terrain hikes or long and bumpy bike rides. PolarPro’s gimbal guard never came off. However, while we transferred to a different rental car the guard did come loose. This was my mistake for not attaching it properly after our last flying location, I believe. Always double-check the lock is on completely or there will be an issue. When I first bought the lock, I didn’t put the guard on all the way. I didn’t hear or feel that “click” I discussed earlier. After hiking a few miles we took the drone out. Well, the lock did come off and when I powered the drone up the gimbal didn’t move. When opening up DJI Go App, I received a notification “gimbal motor overloaded” and freaked out. I manually manipulated the gimbal motor and then restarted the drone. No worries, the gimbal functioned well after that.

Recommendations for using with DJI’s Phantom 4 Pro

  1. Confirm you are using the lock for the P4P, not the standard P4

  2. View my video for proper use

  3. Make sure you feel or hear the “click”

  4. This is a two-handed job, unlike PolarPro’s lock for the regular P4

  5. MAKE SURE IT’S ON PROPERLY

Since purchasing this gimbal lock/lens cover, PolarPro came out with another version. This gimbal lock is for "maximum support" but uses the landing gear like DJI's.

5 Reasons Why I Love the Manfrotto 3N1-36

5 Reasons Why I Love the Manfrotto 3N1-36

Today’s post is about the Manfrotto 3N1-36 and why I believe it’s the best backpack for DJI’s Phantom 4 Pro. If you don't feel like reading this blog, then check the video review here. First, let’s discuss what I’m comparing this Manfrotto pack to. During the time I flew the standard Phantom 4, I used DJI’s hard shell backpack while traveling. In my opinion, that backpack screams “I am carrying a drone.” Its “turtle shell design” and large DJI branding made this pack’s contents easily recognized. This backpack was made for the Phantom 3 Pro but after a few modifications, the P4 fit nicely. While melting the styrofoam inside, a few alterations including making space for the large gimbal lock and increased Milliamp batteries were necessary. After those adjustments were made, I was able to use it successfully during my P4 use.

Then the P4P came out, we were quite excited at the time of the announcement- my GF gave me the approval to order it the first day available. I remember waiting anxiously for a couple weeks before the box showed up on the doorstep. With the P4P’s 20MP camera added to the equation, the hard shell was no longer practical. I also acquired a few more batteries and there so was no additional room in the hard shell for storage.

5 Reasons

Compared to DJI’s hard shell, the Manfrotto 3N1-36 allows for more space. Granted the pack is much larger, but only because it’s designed in a rectangle instead of an oval. Below is a list of everything I could carry inside or attached to the Manfrotto. Notice some items are in bold, these are my five reasons. DJI’s pack couldn’t handle the extra items. Manfrotto’s 3N1-36 is on the high-end of drone backpacks, but here’s why it’s worth the price.

There’s space for (in addition to the P4P & RC):

  • At least five spare batteries
  • ND filters
  • Extra SD Card holder(s)
  • A true 15” laptop
  • Medium-sized Pyrex Container for a meal
  • Two water bottles
  • Portable landing pad
  • Monopod or small tripod
  • DJI battery & RC charger
  • Space for a tablet- I use Apple’s iPad Mini

Manfrotto’s pack comes in handy during hikes too, it’s comfortable even after wearing it for a few hours. I sweat easily and the pack is usually soaked after a couple hours on the trail. However, this is made with nice synthetic material and doesn’t have an odor like some materials after perspiration has dried. I’ve been stuck in the rain with the pack twice and each time the interior is completely dry. Manfrotto includes a rain cover for the pack if you’re out in the elements for long periods of time, but in my case, the pack was only exposed for 30-45 mins.

In conclusion, Manfrotto’s 3N1-36 is by far the best pack on the market right now for the Phantom line. Although this backpack was made for serious photogs, Manfrotto has designed this pack in a way which easily converts to a drone bag. Originally designed to transport a camera(s), up to five lenses, laptop, and tripod, this bag gets it done. Check out my video that shows how much stuff I actually carry in the bag. Of course, each day is different and while I may not pack the bag to the brim, it’s always nice knowing the room is available.

Please contact us with any question about drones, the pack, or past blog posts. For more information about the Manfrotto 3N1-36, follow this link.

Baltimore Drone Blog- How I made my Inspire 1 into an Inspire 2 for $250

Baltimore Drone Blog- How I made my Inspire 1 into an Inspire 2 for $250

I really wanted to upgrade to the DJI Inspire 2, but I have two more semesters of grad school to pay for...obviously, we know what takes priority LOL. Instead of spending the 9k for the package I wanted, I added the Inspire 2's most desirable feature (for me at least) to my Inspire 1 for $250. Anyone that uses the Inspire 1 platform knows when the camera starts moving the remote pilot loses their FPV feed. At this point, I am nearly flying blind and have to navigate the sky only through my POV on the ground. Performing long tracking shots is sometimes stressful because of this. DJI's Inspire 2 does have some characteristics I wish the I1 had including longer flight duration, increased filming capabilities using the X5S, and a separate camera feed for the remote pilot. Standing out to me the most was the implementation of the second camera for FPV flight. I am comfortable with the Inspire 1's flight time and current camera. Furthermore, we only use the Inspire for shots requiring the dual operation. DJI's Phantom 4 Pro is still the main platform we use daily. 

Here is a guide with a picture gallery below which lists the steps I took to install the FPV camera.

  1. Remove the two PH screws holding the nose cone under the gimbal mount - pic 2 & 3
  2. Unscrew the four T9 Torx and pop the nose cone off - pics 4 & 5
  3. Using a pencil, outline the area needed to slide the camera through the nose cone and then drill a hole. After a "guide" hole is formed use the 952 Aluminum Oxide Grinding Stone to make a perfect symmetrical hole - pic 6
  4. Insert the RunCam Eagle into the hole and verify it's tight. I used a hot glue gun to secure the camera in place. It was a little messy but doesn't add much weight. Once the glue has set one can remove the excess with a scalpel - pics 7, 8, & 9
  5. Remove the left arm support and place your video transmitter of choice on the bird (pic 10). I used velcro to attach the FatShark 250mW V3 5.8GHz Video Transmitter With NexwaveRF. However you fashion the transmitter on the Inspire 1 make sure everything is safe when the landing gear move. I raised and lowered the gear multiple times before deciding on a safe placement. Next, add the Inspire's props and spin them around to mimic flight. This is another way to ensure your transmitter and accessories are safe during flight. I also added a second fail-safe, I added a Velcro cable fastener to hold the transmitter's antenna (pic 11). 
  6. Make sure the small battery for the camera and transmitter is secure - pic 12
  7. Attach the left arm support back to the frame and verify correct placement - pic 13
  8. Power on and make sure FPV feed is still working properly after installation - pic 14 & 15

The hard part is over! Now, you need to add your second screen to the Inspire's RC. Using the YKS Carbon Fiber Display Monitor Support Stand, I was easily able to add the FPV screen - pics 16 & 17. Finally, the last step which I was concerned about. Does the new screen work with the iPad Mini too? Is there any overlap? Check out picture 18 in the scrolling gallery below, I think the additional screen looks and functions great.


Baltimore Drone Blog- DJI Mavic Pro Product Review

Baltimore Drone Blog- DJI Mavic Pro Product Review

Today I will be discussing the DJI Mavic Pro, its pros, and cons and why this drone may be a good or bad fit for your #dronelife. First off, the Mavic is a fantastic piece of equipment and the drone never let me down. There were times I’d be flying and a strong gust would roll through and the Mavic always remained locked in place. If you’re reading this and thinking “so is the Mavic right for me?” I’ll be getting to that later in the post. Please keep in mind, I am not affiliated with DJI or any of the other brands I will be bringing up throughout this post. I am a Remote Pilot with four years experience flying drones who enjoys giving my opinion with the hopes that it will benefit others in the future.

Are you a hiker? Mountain biker? Fisherman? Regardless of your hobbies, if you’re looking for a drone that’s compact and will withstand the wind and minimal precipitation this consumer UAS is for you. DJI designed the Mavic to be portable, that was their main concern it seems because the camera is so-so, (we’ll get to the camera a little later) but there are many attributes that make the Mavic Pro a spectacular drone.

Pros and Cons

DJI’s Mavic Pro drone is quite small once folded up in its “transport” stage. See the below pic:

The DJI Mavic Pro and an iPhone 7 Plus to the left for scale

The DJI Mavic Pro and an iPhone 7 Plus to the left for scale

Although not very well protected, the pocket of a normal sized hoodie fits the Mavic with no problem, and the controller I put in my back pocket. Just don’t sit down with the RC in your pocket LOL. I only carried the drone around like this in urban environments when it was best to be “low key” around town. I didn’t get a hardshell case or a protective sleeve like some pilots prefer, but I will say DJI’s original packaging did the trick while in transit.

The Mavic’s overall flight ability was astonishing. From unpacking to landing after a successful mission the Mavic got it done. Unfolding the drone’s legs while simultaneously opening the DJI GO 4 app and connecting the RC, the Mavic is in the air in under a minute. Obviously, if the operator would like to perform a compass calibration or gimbal calibration pre-flight duration will increase. One thing I have noticed from various Facebook groups and forums is this is the stage when most pilots go wrong with the Mavic, and subsequently, their content is sub-par. I am talking about the horrific terrors of having an uneven horizon. When new pilots post their content this is easily noticed, and most, not all, blame DJI. The issue is not the firmware like a lot of new operators think, it’s actually the pilot not following the Mavic’s instruction manual. Each time the drone is powered on, the Mavic (or any other DJI product for the most part) should be on a completely level surface. One of the worst things that can happen is you’re flying and you’ve framed up a beautiful shot, but the damn horizon is crooked. Performing a gimbal auto-calibration will correct this issue, but unfortunately, the Mavic needs to be back on the ground. Obviously the horizon issue can be corrected in post production but in my opinion, taking off with a properly aligned gimbal will save time in the long run.

After approximately ten hours of flight time (25 battery cycles), I have seen the Mavic operate in the sky near flawlessly. The range was impressive, no latency with the FPV feed, and flying in 30 MPH gusts was no problem for the Mavic Pro. DJI’s spec sheet for the Mavic suggests 27 minutes of flight, I never fly my batteries down to 10% or less but I do believe 27 minutes is possible. When I fly, I bring the bird back at the 30% threshold. It’s my belief that using the battery properly will decrease wear and tear on the li-po and will increase battery life while keeping cells intact. Each flight averaged 19-22 minutes depending on factors such as the wind and the mission objective(s).

Let’s talk about the camera - DJI has implemented the Phantom 3 Professional’s camera onto a small but powerful little gimbal, therefore, allowing users to shoot in 4k. Great, the camera can shoot in 4k at 24, 25, and 30 FPS but is the footage high-quality is the question. Simply put, no, I don’t think so. My reasoning for this is the 1/2.3-inch CMOS sensor within the Mavic’s camera. Compared to the Mavic’s big bro, the Phantom 4 Pro and its one-inch sensor, DJI’s Mavic media output is nothing to rave about. This is the main reason why I decided to sell my Mavic, this was not a drone I could use for commercial purposes at all. What’s funny to me is the number of new drone operators that think the Mavic is capable of delivering commercial grade content. There’s been a large spike in consumer drone purchases because of the Mavic’s positive attributes. However, if a novice pilot thinks they are going to buy a Mavic then pass the 107 Exam and start making hand over fist money they’re in for a rude awakening. Sure, the camera is awesome for shooting a couple HDR pics for real estate, but if you’re trying to become one of those “overnight aerial cinematographers” you may want to reconsider the Mavic as your drone of choice.

The Mavic and I - you can see how big the camera actually is. No larger than a dime.

The Mavic and I - you can see how big the camera actually is. No larger than a dime.

Usability of the Mavic is a positive feature too. DJI has designed the Mavic’s controller well, but it does have one flaw. I had to remove two plastic pieces from the RC that “grips” the smartphone being used. No biggie - but I prefer not to remove the phone from its case. Otherwise, the RC fits well in my or my GF’s hands, so it’s perfect for those female pilots too. I know the Inspire 1 RC is tough to handle for long periods of time without using a harness.

Overall the Mavic can hold it’s own in the sky and is a very stable drone, but media content output just isn’t at the level I need it to be for project deliverables.

Positive Features

  • Compact and very portable
  • Long battery life
  • Easy to fly - usability is A+
  • Stability in the air - the Mavic can withstand wind well

Negative Attributes

  • Camera is ok, but not great
  • Controller does not fit iPhone Plus with a case
  • RC doesn’t maintain battery life well
  • When the gimbal lock and protective housing are factored in, I am actually able to get the Phantom line in the air faster

If you’d like to purchase the DJI Mavic Pro here are a couple options:

DJI has pretty much caught up to consumer demand at this time, although during the months of December and January it was slim pickens unless you wanted to get gouged on Craigslist or eBay.

Please feel free to contact me at Robert@baltimoreaerialproductions.com with any question or concerns about my post or the Mavic in general. Happy flying!

Baltimore Drone Blog- Drones VS The Public

Baltimore Drone Blog- Drones VS The Public

Drones are good! Some people are bad...

Recently there has been a lot of fear-mongering by the mass media and small networks across the United States. Sometimes I wonder if it's just business or is it to inform and then potentially scare the public. For those that have minimal knowledge about sUAS (drones), I do understand why some are upset, frustrated, or even scared by this technology. I believe the mainstream media has played a very large part in this drone witch hunt. It's amazing to me sometimes because the same news outlets spreading the fake news about "a possible drone strike" are also the networks using drones to capture b-roll for their telecast. For those residing in the UK, I'm sorry, but you have it the worst. With headlines such as "Drone Strike at Heathrow Airport" one can realize how quickly the perception of drones can change. And change quickly! Sadly, this headline is published before the CAA (UK's version of US' FAA) complete's their investigation. Below is a list of articles describing "drone scares" or "drone near misses" but none of them have actual facts to back their content.

None of the above articles include any facts, which hurts my feelings because it's like blaming the car for driving drunk. The outlets who reported the incident include The Guardian, The BBC, and Daily Mail UK. Each outlet reported the incident on April 17, 2016, and by April 28th, 2016 most outlets reported this was not a drone-related incident. Approximately two weeks had gone by, this allowed viewers to develop a new or different perception of drones and their operators. Remember, the drones don't move themselves a user needs to provide inputs for flight path manipulation.

In the United States, we have our own issues, it seems a war has been declared on drones. The image below was posted near a college campus in Seattle, WA on or about April 7th, 2017. Interestingly enough this flyer doesn't explain why the person that posted is so upset. Not to mention how official the Gmail account is to "report" drones. All this is doing frustrating people that operate responsibly and professionally. I feel this person had a bad experience with a drone, potentially just a hater. Either way, this person(s) is butt hurt and the drone community responded. Below is an image of the original flyer posted:

The original copy of the flyer

The original copy of the flyer

The above flyer is not accomplishing much as the FAA controls and regulates airspace. Maybe it's a local police officer or a concerned citizen. BUT WHY!? If someone is going to write "drones are a direct threat" please explain why. Your words have no meaning in my opinion. 

However, the drone community has responded, notice the difference in Chris Vo's revised copy:

With social media and other forms of digital mass communication I am nearly positive this flyer has backfired on the owner. Check out my Instagram post concerning the flyer. There are far more people that now have seen this that own drones and either operate as a hobbyist or commercially. Personally, I operate under Part 107(commercial) rules and Part 101 (hobbyist) depending on the goal of the operation. We've all sent emails to the address asking "why?" or "are you mad bro?", we just would like to know why. I will keep up with what happens next so stay tuned for an update. 

Baltimore Drone Blog- Click Bait: LAM TM136 Update

Baltimore Drone Blog- Click Bait: LAM TM136 Update

Drone is found not guilty in recent airline incident due to the aircraft's own structure failure

Turns out LAM Flight didn't hit a drone; the "drone strike" was actually a structural failure within the aircraft's nose. I get frustrated with these types of incidents because the media states a plane hit a drone in a breaking news headline. Without any actual proof, the media uses "drone" as a buzzword in the same sentence with "airline" and "collision", etc. This type of journalism is just scary. You're increasing public paranoia for no reason. Imagine the amount of people that saw headlines stating the drone did hit the plane versus headlines. If you're a drone enthusiast ask yourself which version did you see more while scrolling on Facebook.  Here are some sources that we're sure a drone made contact with a commercial airliner LOL.

When in fact, the Aviation Herald didn't say this. They said LAM thought it could be, not that it was. There are UAS that conduct surveys within close proximity to the airport currently but a robot wasn't at fault here. Maybe if a robot put the now …

When in fact, the Aviation Herald didn't say this. They said LAM thought it could be, not that it was. There are UAS that conduct surveys within close proximity to the airport currently but a robot wasn't at fault here. Maybe if a robot put the now of the LAM aircraft together? IDK? 

I'm not sure what to make of all this. It's very frustrating when this type of incident occurs. Drones to blame, well, actually it's the user. Yes, there are catastrophic disasters with drones that are out of our control such as a bird diving into the UAS, a battery malfunction, or a shotgun blast. 

Baltimore Drone Blog- LAM Flight TM-136

Baltimore Drone Blog- LAM Flight TM-136

Photo credit: LAM

Photo credit: LAM

Has anyone heard about the LAM flight that collided a "drone" during final approach? There's been a lot of discussion on Facebook groups since January 6th. Although the incident took place in Tete, Mozambique news spread quickly on social media. LAM posted about the incident on Facebook

Immediately, the opinions being posted stacked up quickly. Some brought up the drones that are used in mining areas not far from the airport. A screenshot using Google Earth shows the proximity of the airport and the mines (red arrows). There's no doubt the two are close but that must've been one rogue drone. Is the mining company missing a drone?

Others have commented about how they've seen drones produce major damage when colliding with another aircraft. However, these were large military drones that weigh a couple hundred pounds. Yes, if a motorcycle sized drone had a collision with a commercial aircraft there would be significant damage. I have no idea what to believe, there's simply no proof. I look forward to hearing more about the investigation when more details have been shared. For now, here are a couple posts from Aviation Herald

What do you think? Drop us a line on Facebook, our contact page, or on Instagram